
After installing your device and completing the initial power-on test, you’re ready to explore its controls and features.
We’ll start with the OLED display, control button, and built-in functions, then explore different ways to connect and control your device.
1. Get to Know Your Device
The OLED display and control button let you check device status, switch wireless modes, and access built-in functions such as Motion and X Mode.
1.1 Device Status Screen
After startup, the OLED status screen shows key information, including connection status, firmware version, internal temperature, and fan speed. The illustration below explains the indicators.
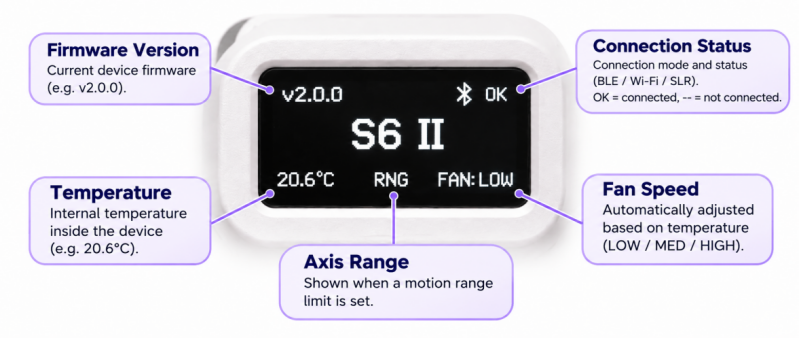
The display updates as the device’s connection and operating state change.
1.2 One-Button Control
A single button on the rear of the device controls the OLED menu and built-in functions. Single-click and double-click actions vary depending on the current device state.
| Device State | Single Click | Double Click |
|---|---|---|
| Standby Screen | No action | Open the main menu |
| Menu | Move to the next item | Confirm selection |
| Motion Playback | Switch to the next Motion | Stop playback and return to the home position |
| X Mode | No action | Exit X Mode; if running, stop motion and return to the home position |
1.3 Built-In Functions
The Main Menu provides access to built-in features and settings. Three menu items are shown at a time; scroll to view more.
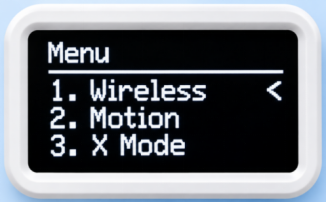
Wireless
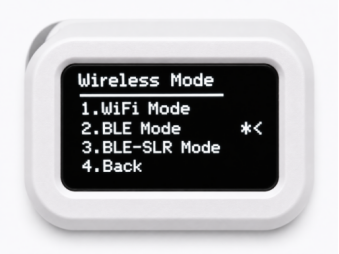
Switch between three wireless connection modes using the device’s OLED menu:
• Bluetooth LE — Standard Bluetooth connection for MiraPlay AiO and other compatible apps.
• Bluetooth LE (SLR) — Connect directly to the SLR website and supported VR apps such as DeoVR.
• Wi-Fi — Connect to a previously configured Wi-Fi network.
When switching to a different wireless mode, the device saves your selection and automatically restarts to apply it.
Note: Set up Wi-Fi through MiraPlay AiO or MiraPlay Web before using Wi-Fi mode for the first time.
Motion
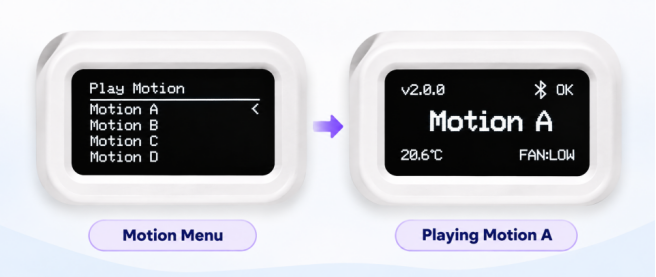
The device includes five built-in motion patterns (Motion A–E), which can be played directly from the OLED menu without connecting to an app or loading a Funscript.
X Mode
X Mode expands incoming single-axis Stroke motion into multi-axis movement directly on the device.
It preserves the original Stroke motion and adds movement on the other axes using one of five built-in Motion patterns (A–E). A Motion is randomly selected each time a new single-axis motion sequence begins.
X Mode can be enabled from the OLED menu and is automatically disabled after a restart.
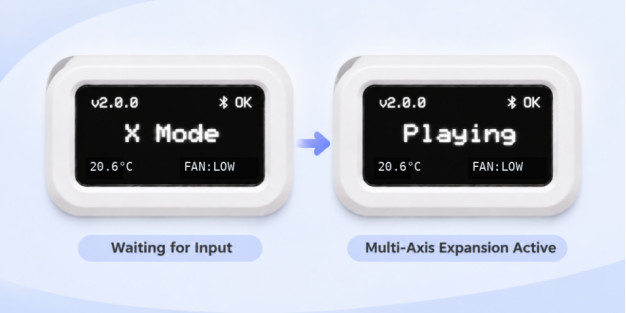
Info & Axis Range
• Info — Shows device and connection details, such as the device ID, Wi-Fi SSID, IP address, and other information.
• Axis Range — Shows the saved motion range for each axis (default: 0%–100%). If any axis is limited, RNG appears on the main status screen.
2. Connect Your Device
MiraBot S6 II defaults to Bluetooth LE for quick connection via MiraPlay AiO, with no network setup required. If you prefer Wi-Fi, you can configure it later through the app.
If you haven’t installed MiraPlay AiO yet, visit the MiraPlay AiO page to learn more and download the app.
Auto Reconnection: MiraPlay AiO remembers your last connected device and connection method. When you reopen the app, it automatically reconnects via Bluetooth LE or Wi-Fi, provided the device is powered on and the corresponding connection is available.
Compatibility Note: Wireless mode switching and Wi-Fi setup in MiraPlay AiO are supported on MiraBot S6 II. For earlier MiraBot S6 and MiraBot Lite models, firmware v1.3.1 or later is required.
2.1 Connect via Bluetooth LE
Step 1 — Start Adding Your Device
For the first Bluetooth LE connection, tap the device status bar in the upper-left corner of MiraPlay AiO, then select Add New Device from the device list.
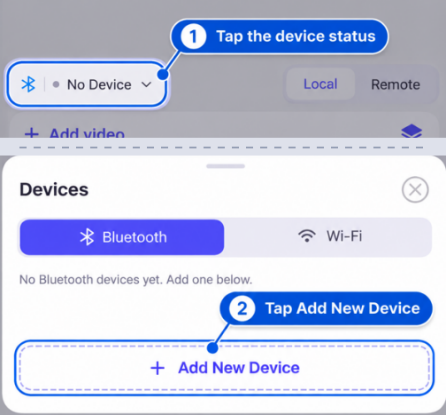
Step 2 — Complete Bluetooth Connection
Select MiraBot → Bluetooth → Wait for the scan → Find your device and tap Add → Once connected, tap Finish.
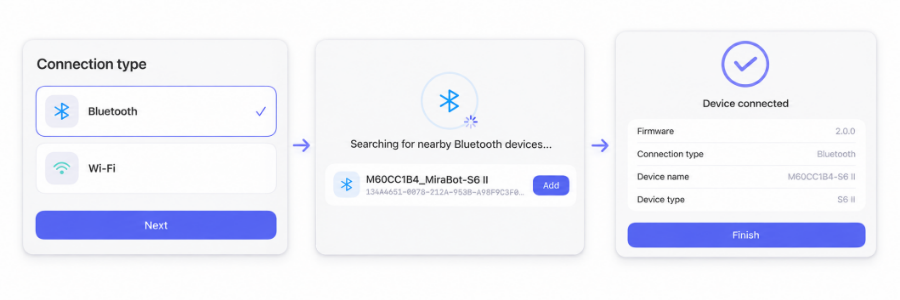
Once connected, your device name will appear in the upper-left corner of the app. You’re now ready to explore its multi-axis motion and interactive features.
2.2 Connect via Wi-Fi
If you prefer to connect your device via Wi-Fi, you can set up the network directly in MiraPlay AiO without a computer.
Step 1 — Open Wi-Fi Setup
Keep your device connected to MiraPlay AiO through Bluetooth LE.
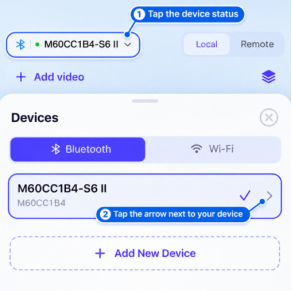
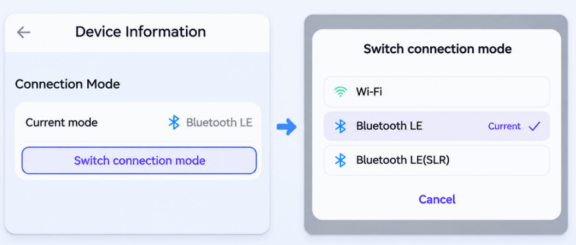
Tap the connected device’s name in the upper-left corner to open the device list. Then tap the arrow next to your device to open Device Information. Under Connection Mode, tap Switch connection mode, then select Wi-Fi to open the network setup screen.
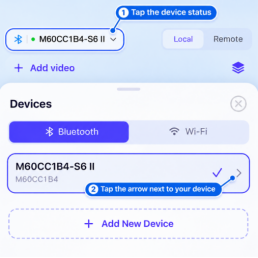
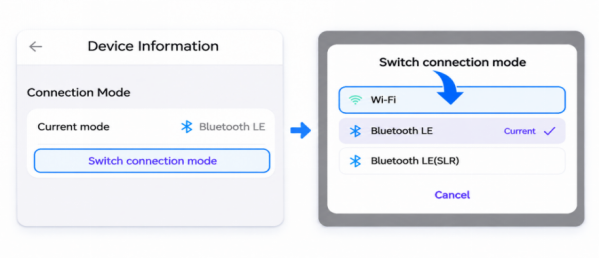
Step 2 — Configure Wi-Fi
Your device supports 2.4 GHz Wi-Fi only, not 5 GHz. You can set up Wi-Fi in three ways:
- Manual Setup: Enter the Wi-Fi network name (SSID) and password.
- Use Phone’s Current Wi-Fi: Tap Use phone’s current Wi-Fi to automatically fill in the SSID. You’ll still need to enter the password.
- Use Saved Wi-Fi: If your device has saved Wi-Fi settings, the network name will appear. Tap Use saved Wi-Fi to reuse those settings without entering them again.
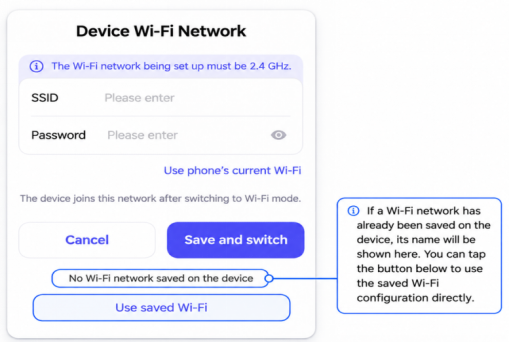
Tap Save and switch to apply the settings. The device will restart in Wi-Fi mode and attempt to connect to the network.
Check Wi-Fi Connection: Confirm the connection on the OLED display. If it fails, check the SSID and password, and make sure you’re using a 2.4 GHz Wi-Fi network. You can switch back to Bluetooth LE using the OLED menu and reconfigure Wi-Fi through MiraPlay AiO.
For Other MiraBot Models: On devices without an OLED display, use MiraPlay Web to switch modes or reconfigure Wi-Fi.
Step 3 — Connect Your Device via Wi-Fi
Before proceeding, make sure your phone and device are connected to the same Wi-Fi network. Check the device’s OLED display to confirm that the Wi-Fi connection status shows OK.
For your first Wi-Fi connection, tap the device status bar in the upper-left corner of MiraPlay AiO, switch to the Wi-Fi tab, then select Add New Device.
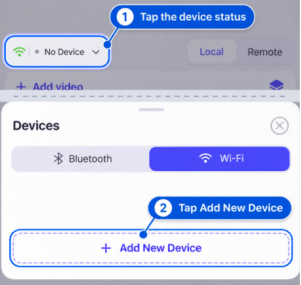
Select MiraBot → Wi-Fi. The app will automatically attempt to connect to a MiraBot device already on the same Wi-Fi network as your phone. If multiple MiraBot devices are available on that network, the app will connect to one at random.
Once connected, the app will display a connection success screen. Tap Finish to complete the process.
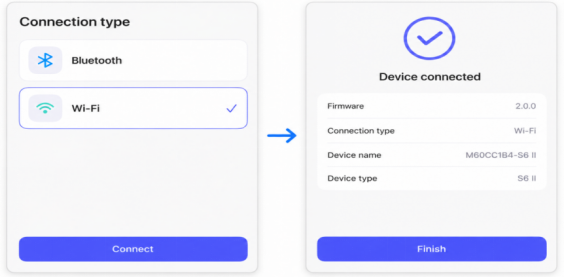
Your device name will then appear in the upper-left corner of MiraPlay AiO. You’re now ready to explore its multi-axis motion and interactive features.
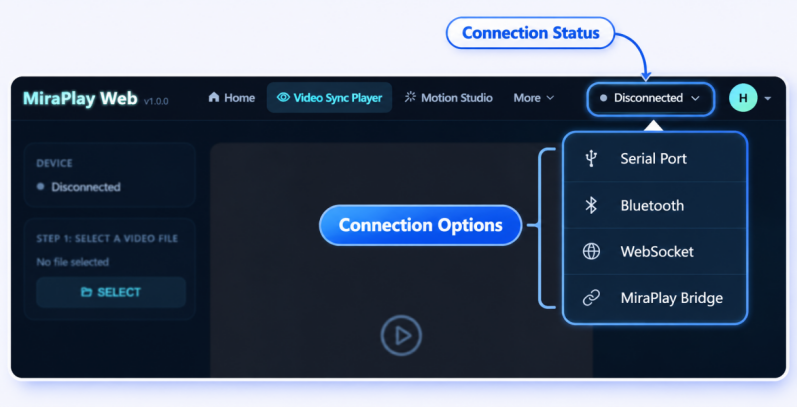
Other Connection Options — MiraPlay Web
You can also connect your device through MiraPlay Web using Serial Port, Bluetooth, WebSocket (Wi-Fi), or MiraPlay Bridge (via MiraPlay AiO).
2.2 Switching Connection Modes
You can switch wireless modes through MiraPlay AiO, the device’s OLED menu, or MiraPlay Web.
Note: After switching modes, the device saves your selection and restarts to apply it.
1) Switch via MiraPlay AiO
Switch between Bluetooth LE, Bluetooth LE (SLR), and Wi-Fi directly from your phone, as shown below.
2) Switch Directly on the Device
Use the device’s OLED menu and control button to switch between wireless modes.
3) Switch via MiraPlay Web
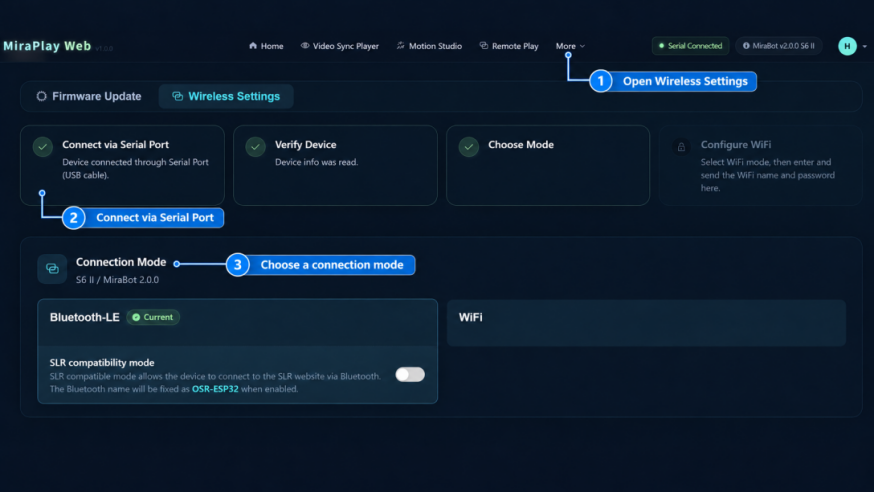
Open MiraPlay Web, connect your device via USB Serial, then go to More → Wireless Settings → Connection Mode.
3. Control with MiraPlay AiO
Once your device is connected, you can use MiraPlay AiO’s Player, Gesture, Browser, Remote, and More sections to control your device and access additional features.
3.1 Player
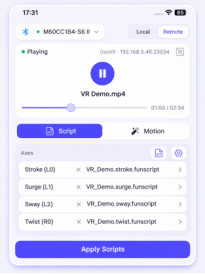
VR Headset Sync
Sync VR videos in DeoVR or HereSphere with single- or multi-axis Funscripts. Select scripts and control playback directly from your phone, with no PC required.
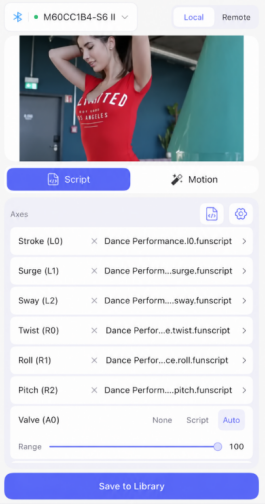
Video & Script Playback
Play local videos, including VR videos, with synchronized single- or multi-axis Funscripts. Valve and Lube scripts are also supported. Funscripts can be played without a video.
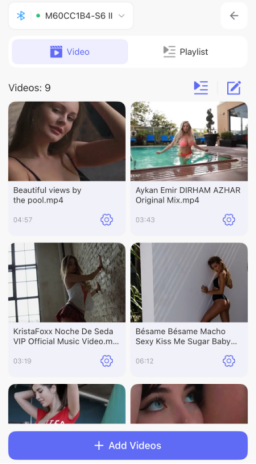
Local Library
Import videos and Funscripts individually or in batches, with FTP support for file transfers. Organize your library and playlists for easy playback.
Smart Script Matching
When importing videos or selecting a Stroke (L0) Funscript, MiraPlay AiO looks for matching scripts in the same folder. You can review and confirm replacements before applying them.
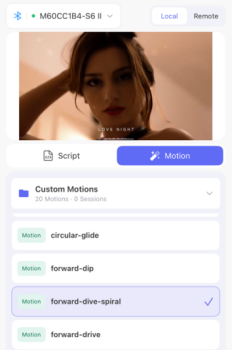
Motion Playback
Play multi-axis Motions alongside videos, without needing a matching Funscript. Motions saved in Motion Studio are available to download in MiraPlay AiO.
3.2 Gesture
Gesture Sync
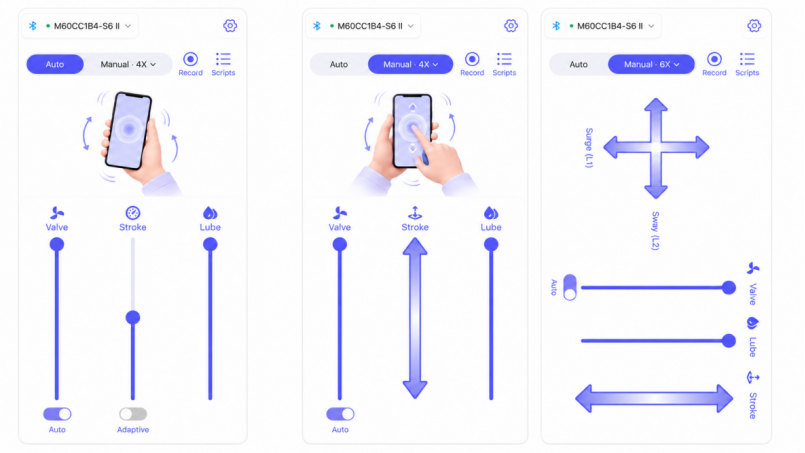
Turn your phone into a real-time multi-axis motion controller. In all three modes, your phone’s motion sensors control Roll, Pitch, and Twist. The remaining axes are controlled as follows:
- Auto Mode: Stroke runs automatically. When Adaptive is enabled, its speed adjusts to your phone’s movement; when disabled, Stroke runs at a fixed speed.
- Manual 4X: Control Stroke by swiping up and down on the touchscreen, for a total of four controlled axes.
- Manual 6X: Use touchscreen controls to manually control Stroke, Surge, and Sway, for a total of six controlled axes.
All three modes also support manual Valve and Lube control.
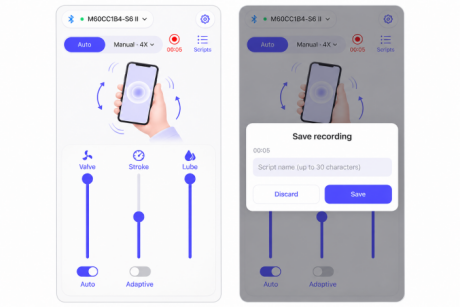
Gesture Recording & Playback
Record your Gesture movements as multi-axis Funscripts, including Valve and Lube controls. Save recordings to your library for playback or use with videos.
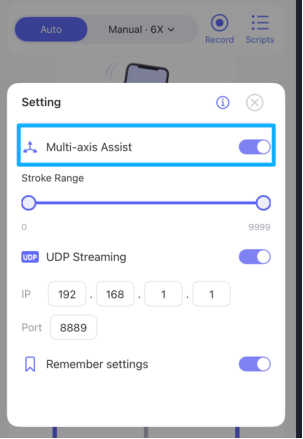
Multi-Axis Assist
Add real-time Roll, Pitch, and Twist movements from your phone to a single-axis Stroke Funscript, creating a multi-axis experience while preserving the original Stroke motion.
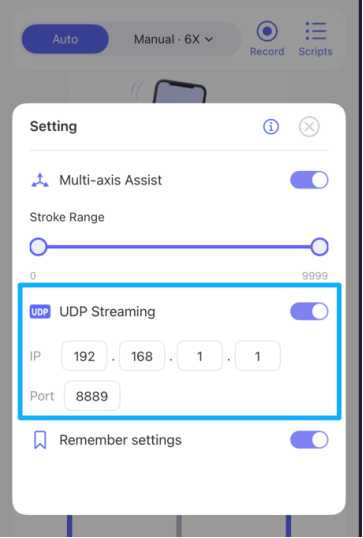
UDP Streaming
Stream real-time motion data from your phone over UDP to compatible applications, such as controlling a character in Virt-A-Mate.
.
3.3 Browser
Browse and play online videos and audio with local single-axis or multi-axis Funscripts, keeping device motion synchronized with media playback without downloading the media first.
Browse & Download
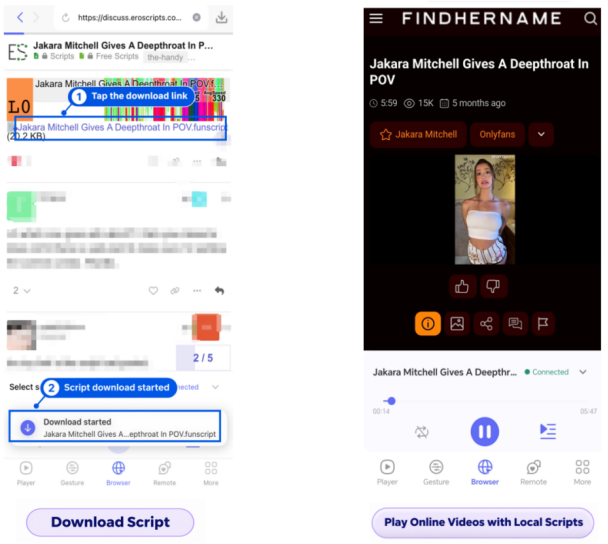
Browse online videos and manually download available scripts, videos, audio, and images.
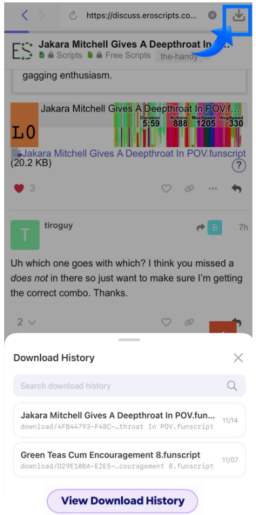
Download History
View your download history and keep track of downloaded resources.
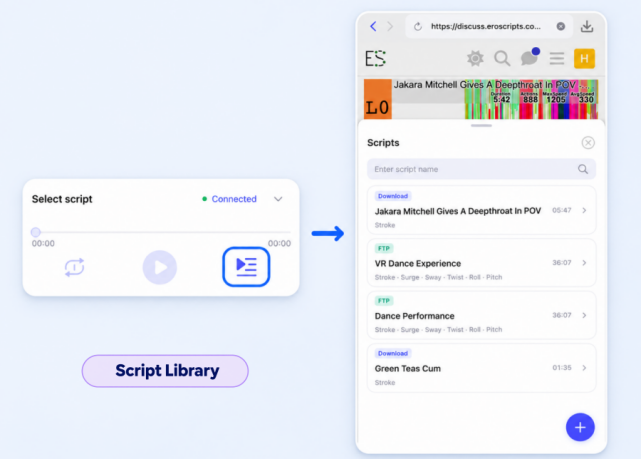
Script Management
Manage your downloaded, uploaded, and recorded scripts. Edit or delete scripts as needed.
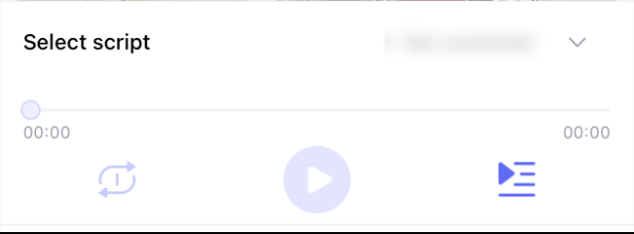
Script Player
Play selected scripts, enable loop playback, or run scripts independently without an online video.
3.4 Remote Play (Beta)
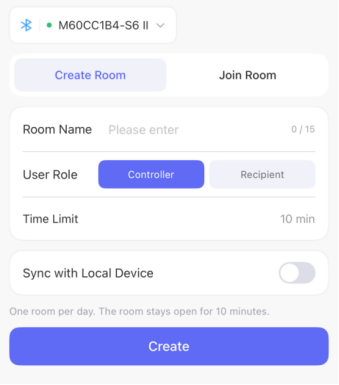
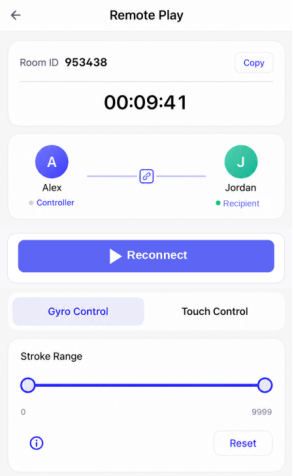
Remote Play lets you control another user’s connected device over the internet using MiraPlay AiO’s Gesture controls.
- Private Rooms — Create and share a temporary room for remote interaction.
- Gesture Control — Use your phone’s motion sensors and touchscreen to control a remote device.
- Multi-Axis Control — Send multi-axis motion commands to the remote device in real time.
Note: Remote Play is currently in beta, with daily usage limits in place. Connection latency or interruptions may occur during remote sessions, depending on network conditions and server availability.
3.5 More
The More section provides additional device tools and app settings.
- Position Calibration & Axis Range — Access device calibration and motion range settings.
- Device Motion Test — Test device movements and check basic operation.
- Device Bridge — Use MiraPlay AiO as a connection bridge between your device and MiraPlay Web.
- General Settings — View account information, change the app language, submit feedback, and check the app version.
4. Control with MiraPlay Web
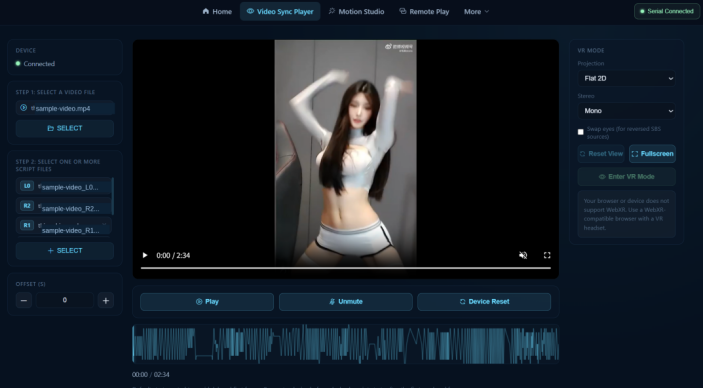
MiraPlay Web provides browser-based video playback, multi-axis motion control, and motion creation on your computer.
4.1 Video & VR Playback
Play local videos with synchronized single-axis or multi-axis Funscripts, with motion smoothing and interpolation support.
MiraPlay Web also supports immersive VR video playback through the built-in browser on compatible headsets such as Meta Quest, with Funscript-controlled device motion.
4.2 Motion Studio
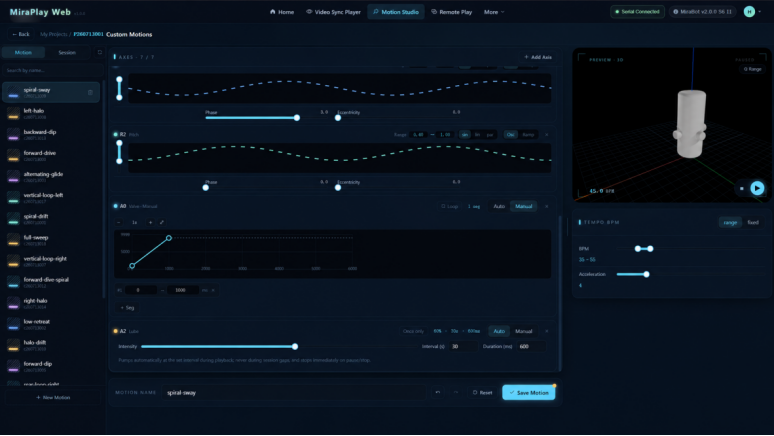
Quickly create custom multi-axis Motions for videos, audio, or standalone playback by adjusting parameters such as speed, movement range, and curve type, without manually editing every movement point.
You can also combine Motions into longer Sessions and preview your work using motion curves and a 3D device model. Through Motion Hub, you can share your work and download creations from other users.
For more details and instructions, see the Motion Studio User Guide.
4.3 Remote Play (Beta)
Create or join an online room to interact with other users through gesture-based remote control of their connected devices.
Note: Remote Play is currently in beta. Connection quality and responsiveness may vary depending on network conditions.
5. Third-Party Software
MiraBot S6 II also supports third-party software such as MultiFunPlayer (MFP), Ayva, EDI, and Virt-A-Mate (VaM), as well as other compatible OSR / T-Code applications.
Supported features and connection methods may vary depending on the software.
For more information and setup guides, visit Related Software.