
1. Motion Studio Overview
Motion Studio is an online motion creation platform for multi-axis SR devices, including MiraBot, OSR2+, and SR6. It allows users to create, combine, preview, and share custom motion content.
Motion Studio is available in two versions:
- Web version: Built into MiraPlay Web and accessible directly from a browser.
- Windows client: Provides nearly the same editing features as the Web version, with additional local API support for third-party software, games, and mods.
Unlike Funscript, which mainly records positions point by point along a timeline, Motion Studio generates motion through adjustable parameters. By setting the movement range, speed, curve type, phase, and other properties for each axis, users can quickly create coordinated multi-axis movements.
This parameter-based workflow significantly reduces the time and learning required to create multi-axis content. Even users with no previous scripting experience can create and share their own Motions and Sessions after learning the basic controls.
For game developers and mod creators, the Motion Studio Windows client also provides a local API. Games and other applications can trigger existing Motions or Sessions while running and control MiraBot or compatible OSR devices in real time. This reduces the need to manually create separate multi-axis scripts for every scene.
2. Core Concepts
Motion Studio content is organized into three main levels:
Project
A Project is the main container for your motion content.
Each Project can contain multiple Motions and Sessions. It also stores the Project name, description, and other related content.
Projects are the main unit used for creating, editing, saving, and sharing content.
Motion
A Motion is a custom movement generated from parameters.
A Motion can use between one and six axes. Its behavior is defined by global settings and individual axis settings.
Motions are commonly used to create repeating movements. They can also use Ramp mode to create more precise, non-repeating motion paths.
Session
A Session is a longer sequence created by arranging multiple Motions in chronological order.
Sessions can be used to create complete scenes with changing speed, intensity, and movement styles. They can also be edited in sync with video or audio.
The basic structure is:
Project → Motion / Session → Multi-axis motion parameters
3. Main Screen
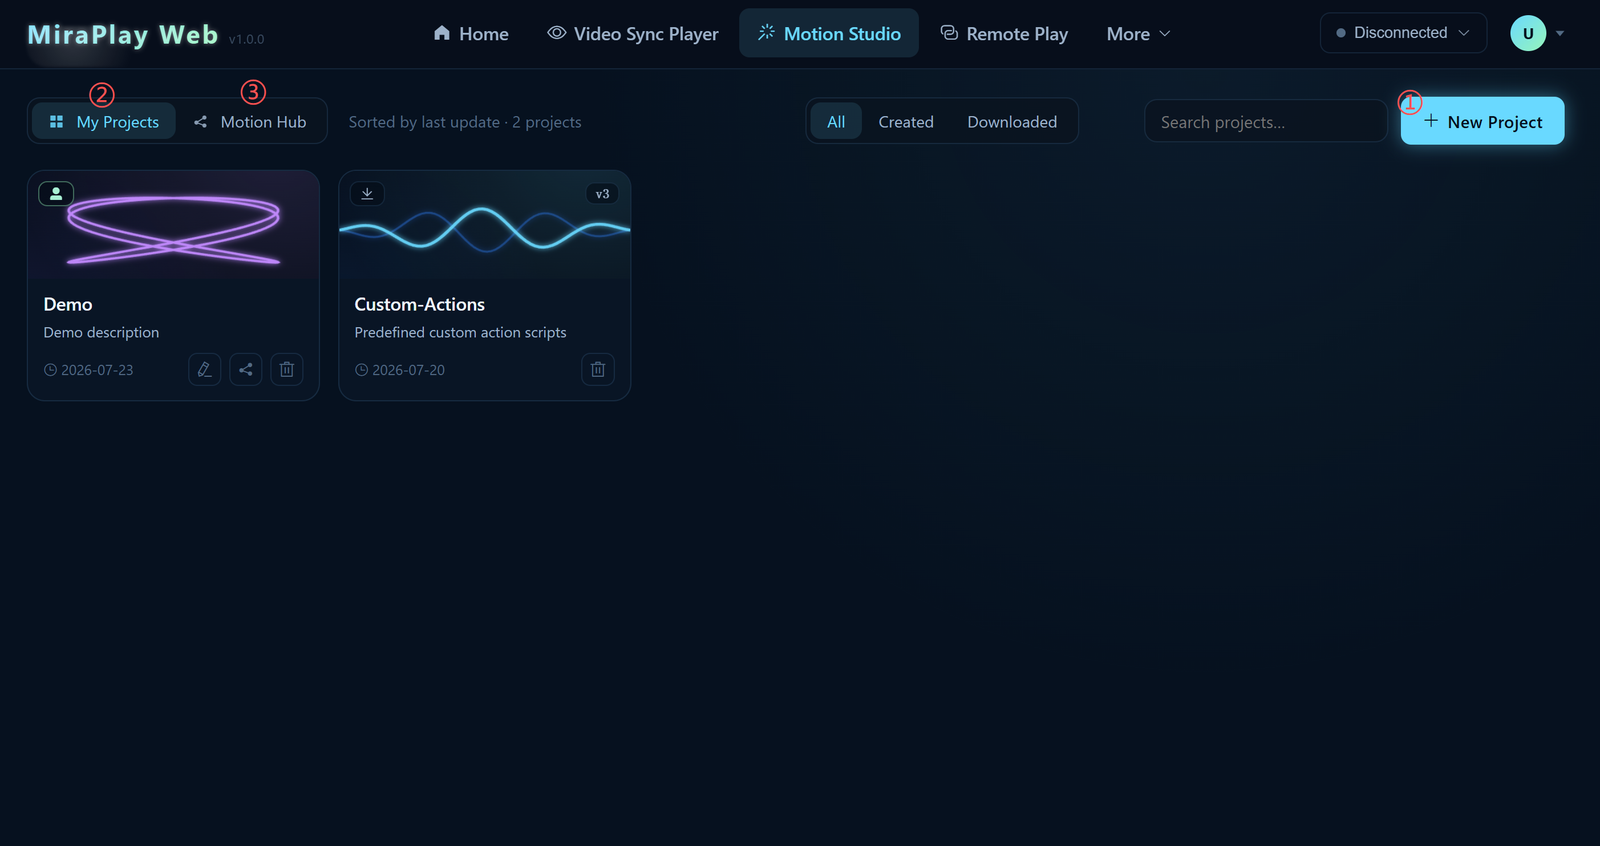
3.1 New Project
Click New Project to create a new Project.
You can set:
- Project name
- Description
- Cover image
After creation, the Project will appear under My Projects. Click the Project card to open the editing screen.
3.2 My Projects
My Projects contains:
- Projects you created
- Projects downloaded from Motion Hub
Click any Project card to open it.
For Projects you created, use the share button on the Project card to publish them to Motion Hub for other users to browse and download.
When you edit and republish one of your published Projects, its version number is updated automatically.
3.3 Motion Hub
Motion Hub is the community sharing area in Motion Studio.
In Motion Hub, users can:
- Browse Projects shared by other users
- Download Projects
- Like Projects
- Add Projects to My Projects
Downloaded Projects can be modified to suit your device or personal preferences. However, they are for personal use only and cannot be republished as your own work.
4. Project Editing Screen
After opening a Project, you can create and manage Motions and Sessions separately.
A Project can contain multiple independent Motions, as well as one or more Sessions made from those Motions.
It is usually best to create and test frequently used Motions first, then insert them into a Session.
For movements used only in a particular Session, you can also create a temporary Motion directly from the Session editing screen.
5. Editing a Motion
5.1 Motion Structure
A Motion is a multi-axis movement generated from parameters.
When creating a Motion, first select the axes you want to use. You can then set the overall speed and define the movement path for each axis.
A Motion can use up to six axes:
| Axis | Name | Main Movement |
|---|---|---|
| L0 | Stroke | Vertical movement |
| L1 | Surge | Forward and backward movement |
| L2 | Sway | Left and right movement |
| R0 | Twist | Rotation |
| R1 | Roll | Left and right tilt |
| R2 | Pitch | Forward and backward tilt |
When a new Motion is created, L0 (Stroke) is added by default.
Click Add Axis to add more axes. Each axis can only be added once.
Motion settings are divided into:
- Global settings
- Individual axis settings
5.2 Global Settings
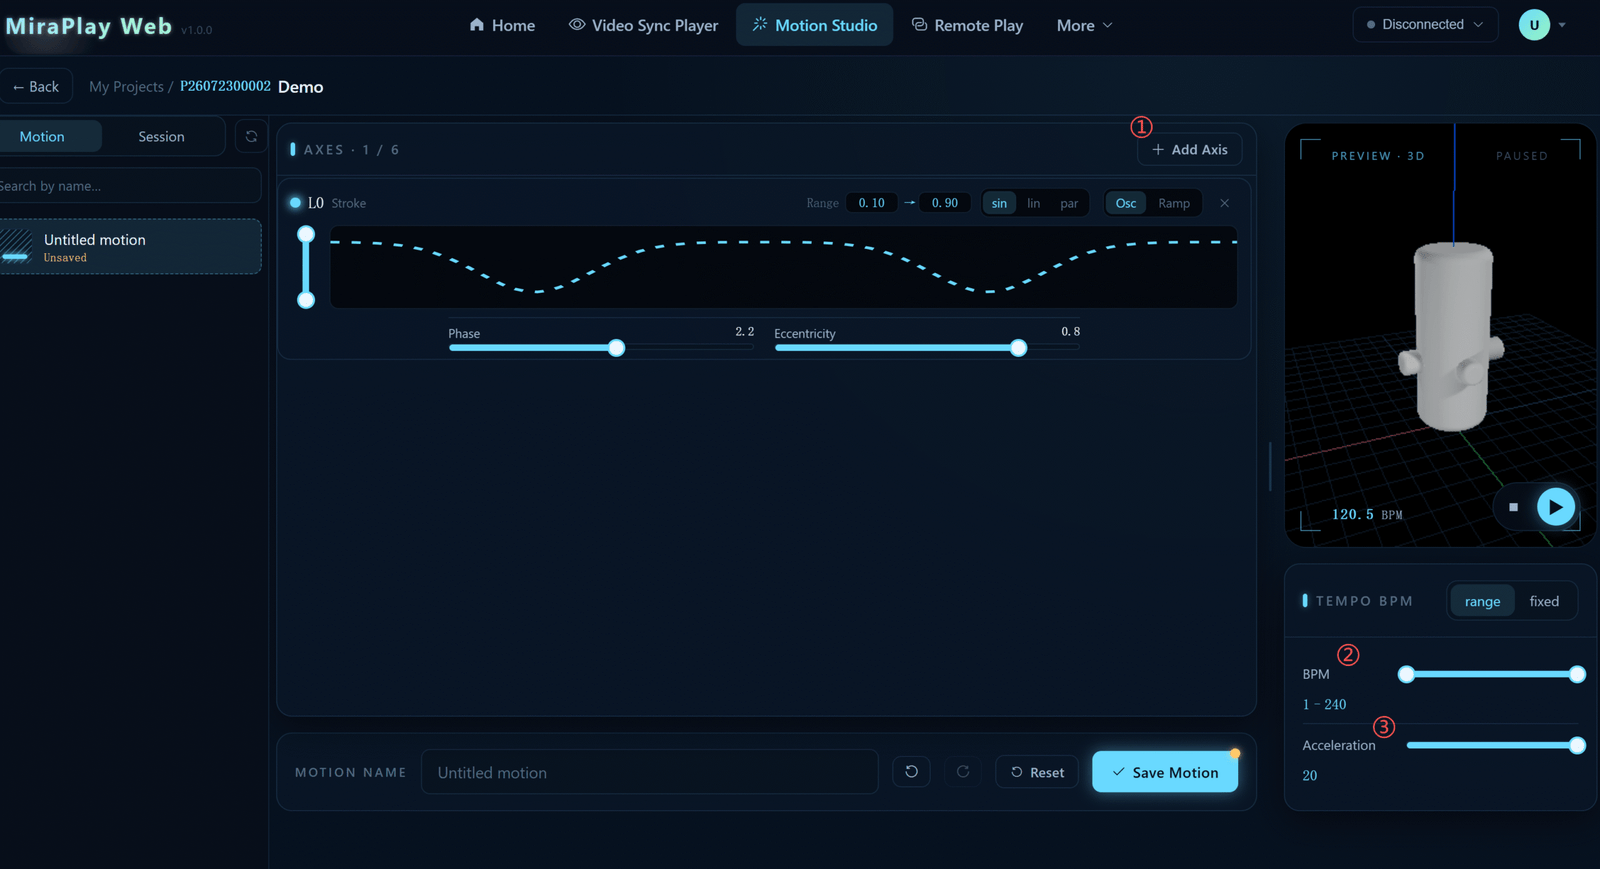
①Add Axis
Click Add Axis to add another movement axis to the current Motion.
A Motion can use only one axis or all six axes. Axes that have not been added will not move during the Motion.
②BPM
BPM controls the overall speed of the Motion.
You can set:
- A fixed BPM
- A BPM range
With a fixed BPM, the Motion repeats at a constant speed.
With a BPM range, the speed can change within the selected limits. This can produce more natural, gradual, or varied movement.
BPM affects the entire Motion. However, each axis can still behave differently through its Phase, Range, and curve settings.
③Acceleration
Acceleration controls how quickly the Motion speeds up or slows down when the BPM changes.
A lower or smoother setting creates more gradual speed changes. A faster setting allows the Motion to reach its new speed more quickly.
When using a BPM range, Acceleration has a direct effect on how natural the speed changes feel.
5.3 Axis Settings
Each added axis has its own motion settings.
Motion Studio provides two main motion generation modes:
- Osc mode
- Ramp mode
Each axis can use the mode that best suits the movement you want to create.
5.3.1 Osc Mode
Osc is a repeating mode used to create periodic back-and-forth movement. It is suitable for most continuous motion patterns.
Instead of drawing the entire path point by point, you set a small number of parameters and Motion Studio automatically generates a repeating motion curve.
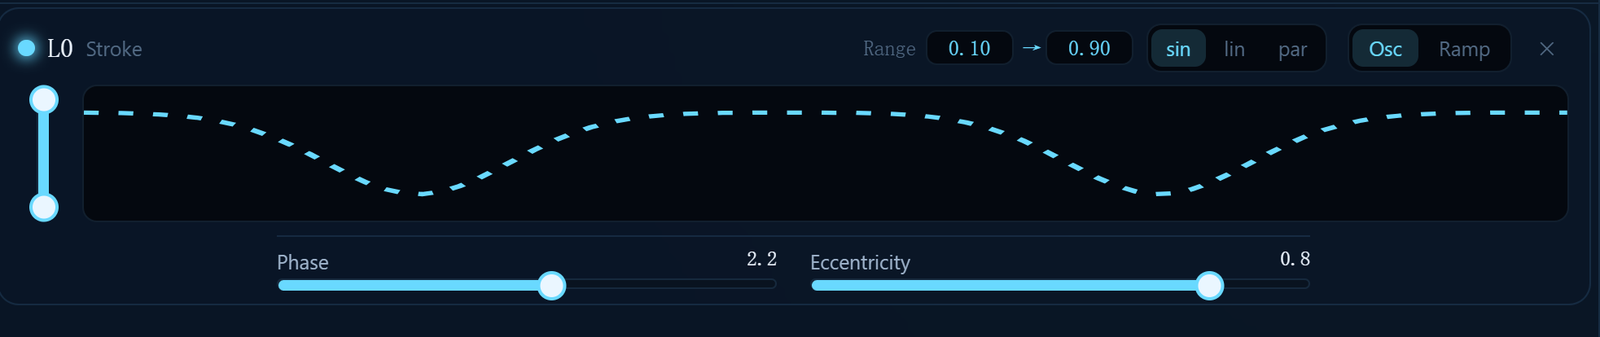
Range
Range sets the movement limits for the selected axis.
The usual value range is:
0.00–1.00
Where:
0.00represents the lowest position of the axis1.00represents the highest position of the axis
You can enter the values directly or drag the start and end positions using the visual axis control on the left.
A smaller Range creates shorter movements. A wider Range uses more of the available axis travel.
Sin / Lin / Par
Sin, Lin, and Par select the movement curve type.
Sin :
Sin uses a sine-wave curve.
The movement slows near both ends of the travel and speeds up around the center. This creates a smooth and natural transition and works well for most continuous movements.
Lin :
Lin uses a near-linear movement curve.
The speed remains more consistent, and direction changes feel more direct. This is suitable for movements with a clear rhythm or a more mechanical feel.
Par :
Par uses a parabolic movement curve.
It changes how speed is distributed throughout the movement, creating more noticeable acceleration or deceleration in certain parts of the travel.
Changing the curve type does not change the Range. It changes how the axis moves within that Range.
Phase
Phase adjusts the timing offset of the selected axis within the Motion cycle.
When multiple axes use the same BPM, different Phase values prevent them from reaching their highest or lowest positions at the same time.
This can create offset, rotating, rocking, or wave-like multi-axis movements.
For example:
- Same Phase: The axes move mostly in sync.
- Different Phase: The axes move at different points in the cycle.
Phase is one of the most important settings for creating coordinated multi-axis movement.
Eccentricity
Eccentricity changes how movement is distributed within one cycle.
It can shift the movement toward one side of the travel or change the speed and dwell balance between the forward and return movements.
This makes it possible to create less symmetrical and more distinctive movement patterns.
Eccentricity is usually adjusted together with Range, Phase, and the selected curve type.
Motion Curve and 3D Preview
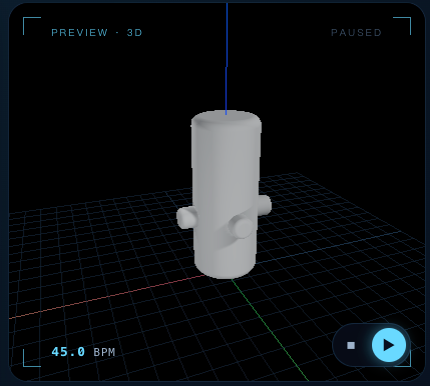
After adjusting an axis, you can review the result in two areas:
- Motion curve: Shows the position and timing relationship of each axis.
- 3D preview: Shows the combined movement using a virtual device model.
When using multiple axes, check both the curves and the 3D model to confirm that the direction, movement range, and Phase relationships are correct.
The 3D preview is a simulation of the motion structure. Actual device movement may vary depending on the device design, installation, load, and axis travel limits.
5.3.2 Ramp Mode
Ramp mode is used to create non-repeating movements or motion paths that require precise control.
Unlike Osc mode, which generates a repeating curve from parameters, Ramp mode allows you to place movement segments directly on a timeline.
Click + Seg to add a new segment. The minimum duration of each segment is 50 ms.
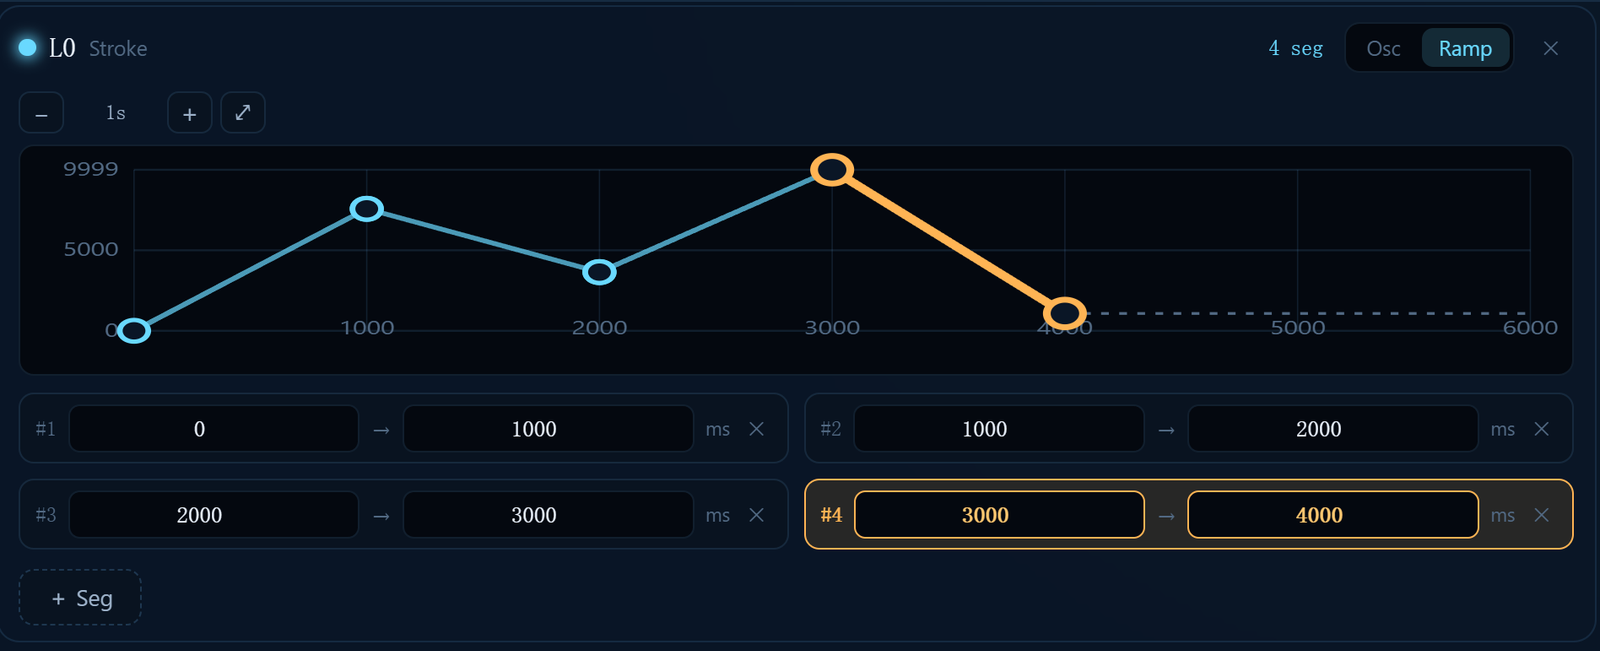
Each segment includes:
- Start time
- End time
- Start position
- End position
Drag the start and end points of a segment to define how the selected axis moves from one position to another during that time.
Multiple segments can be placed one after another to create a complete custom path.
Ramp mode is suitable when:
- Precise motion timing is required
- Specific start and end positions are needed
- Osc settings cannot produce the required movement
- You need short, sudden, or irregular movements
- An axis needs to stop or change direction at a specific time
Ramp mode provides more precise control, but usually takes longer to edit because the timing and positions must be set manually.
6. Editing a Session
6.1 What a Session Is Used For
A Session combines multiple Motions into one complete sequence.
A single Motion normally represents one repeating movement pattern. A Session can switch between different Motions over time to create longer content with changing speed, range, direction, and axis combinations.
Sessions are commonly used for:
- Synchronizing movement with video
- Following audio or music
- Creating multi-stage interactive scenes
- Scheduling different motion intensities over time
- Creating game events or scene sequences
- Combining frequently used Motions into complete content
6.2 Session Editing Screen
The Session editing screen is divided into three main areas:
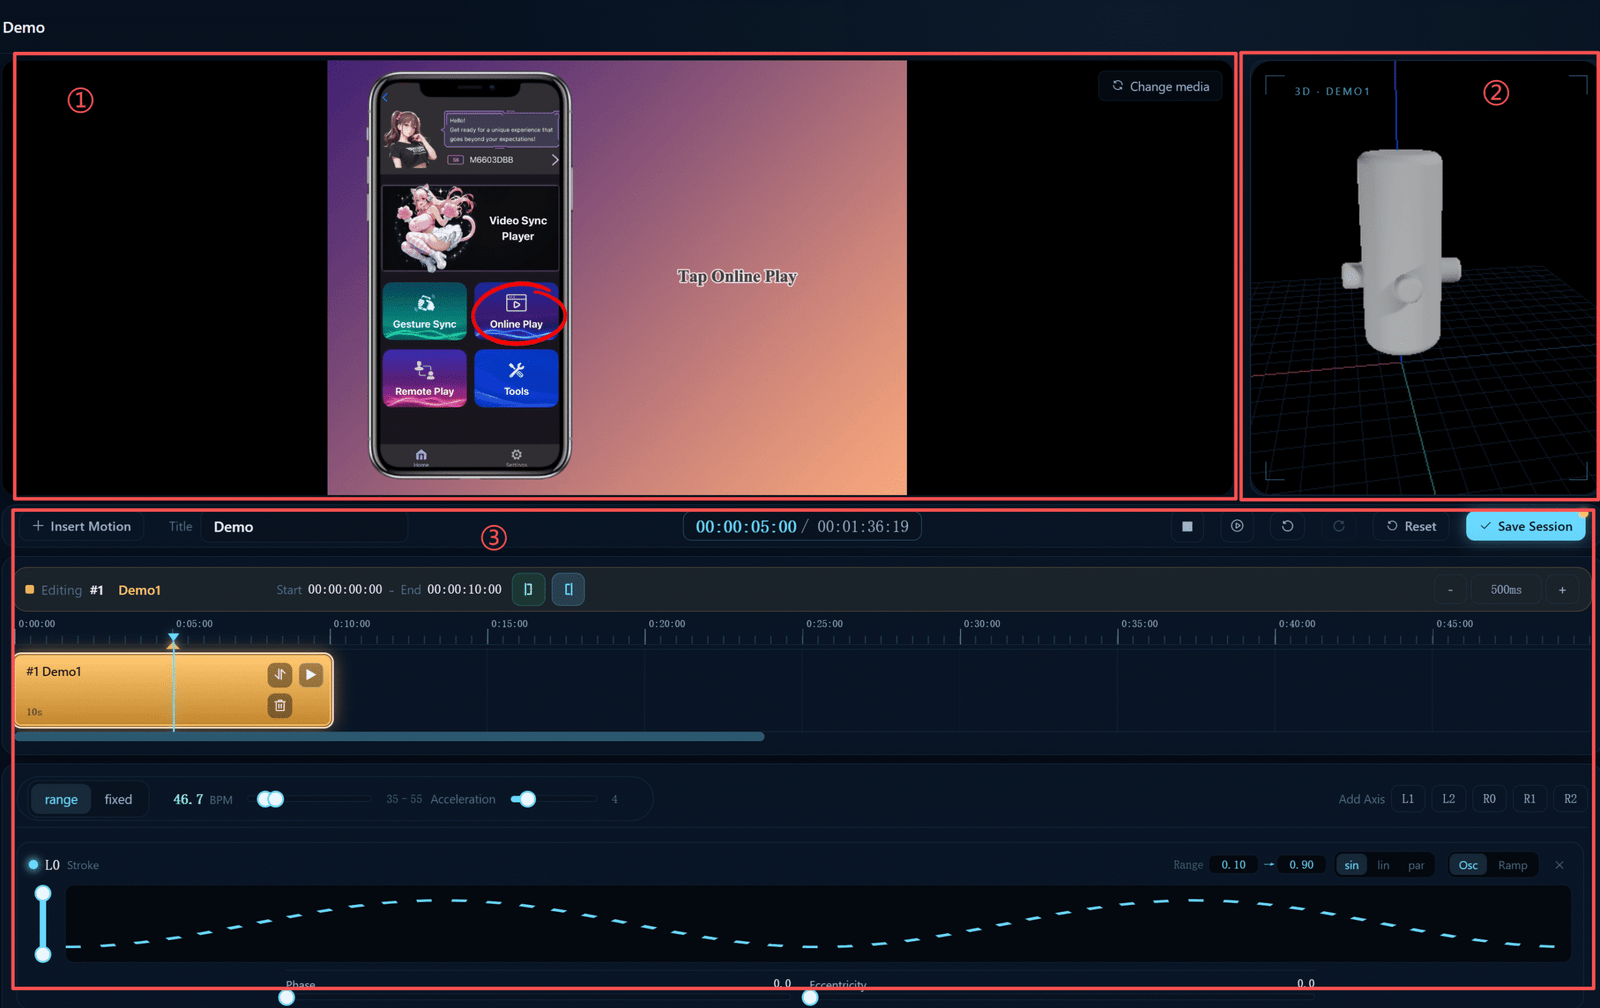
① Media Player
The media player can load a video or audio file as a timing reference while editing the Session.
When the media is played, the Session timeline below it plays in sync. This makes it easier to arrange Motions according to visual events, sound, or rhythm.
Media is optional and is mainly used as a reference during creation and preview.
② 3D Preview
While a Session is playing, the 3D preview displays the device movement based on the Motion currently active on the timeline.
Use the 3D model to check:
- Transitions between Motions
- Coordination between axes
- Movement direction in different sections
- Whether the Range is too large or too small
- Whether the overall pacing feels correct
③ Session Editing Area
The Session editing area is used to add, arrange, and edit Motions on the timeline.
There are two ways to add a Motion:
Insert an Existing Motion
Select a Motion that has already been created in the current Project and insert it into the Session.
After inserting it, you can set how long it will play.
Even if the original Motion is designed to repeat continuously, it will only run for the duration assigned to it in the Session.
This method is suitable for reusing Motions that have already been created and tested.
+ New Motion
Click + New Motion to create a new Motion directly inside the current Session.
This Motion uses the same axis settings and editing tools as a standard Motion. However, it is mainly intended for a specific section of the current Session, rather than as a shortcut for creating a reusable Project-level Motion.
Use this option when:
- The current Session needs a temporary Motion
- Existing Motions do not fit a particular section
- The Motion does not need to be reused elsewhere
- You want to create it without leaving the Session screen
Editing a Motion Inside a Session
Click a Motion segment on the Session timeline to display its multi-axis editing panel below.
You can directly adjust:
- Active axes
- BPM
- Acceleration
- Range
- Curve type
- Phase
- Eccentricity
- Ramp segments
Changes can be reviewed immediately using the timeline and 3D preview. You do not need to return to the separate Motion editing screen.
Timeline
The timeline at the top of the Session area shows:
- Total Session duration
- Current playback position
- Start and end time of each Motion
- The order of Motions in the Session
- Synchronization between media and movement
When you play, pause, or drag the timeline, the media player, Motion settings, and 3D preview update together.
For longer Sessions, it is best to add and test Motions section by section instead of building the entire Session before reviewing it.
7. Saving, Testing, and Sharing
7.1 Saving Content
After editing a Motion or Session, click Save.
The saved content remains inside the current Project and can be opened again from My Projects.
Before leaving the page or switching Projects, confirm that your latest changes have been saved.
7.2 Previewing and Testing on a Device
Before publishing a Project, we recommend checking the following:
- Review the movement range of each axis using the motion curves.
- Review the combined multi-axis movement in the 3D preview.
- Connect the device and test at a low speed.
- Confirm that no axis exceeds its safe travel range.
- Check that transitions between Motions are smooth.
- Confirm that the Session is correctly synchronized with the media.
When testing a new Motion for the first time, begin with a low BPM and a small Range. Increase the speed and movement range gradually.
7.3 Sharing to Motion Hub
Projects you create can be published to Motion Hub.
Before publishing, confirm that:
- The Project name is clear and easy to understand.
- The description accurately explains the movement style.
- The Project does not contain prohibited content involving violence, minors, or animals. Such content will be removed immediately when identified.
- All Motions and Sessions have been saved.
- The Project has been checked in the 3D preview and tested on a device.
- The Project does not contain unrelated or unfinished content.
When you edit and republish one of your own published Projects, the version number is updated automatically.
Projects downloaded from Motion Hub can be edited and used, but cannot be republished. This also applies to modified or derivative versions.
8. Differences Between the Web Version and Windows Client
The Motion Studio Web version and Windows client have nearly the same editing interface and workflow.
Both versions support:
- Creating and managing Projects
- Creating Motions
- Creating Sessions
- Editing multi-axis parameters
- Using motion curves and the 3D preview
- Saving and managing content
- Using Motion Hub
The main difference is that the Windows client also provides local runtime and third-party integration features.
Web Version
The Web version is built into MiraPlay Web and is designed for users who want to create and manage motion content directly from a browser.
Main features include:
- No separate Motion Studio installation required
- Browser-based access
- Suitable for creating, editing, and sharing Projects
- Works with MiraPlay Web accounts and cloud-based Project features
Windows Client
In addition to the full editing tools, the Windows client can operate as a local motion runtime service.
Third-party software, games, and mods can use its API to perform actions such as:
- Read the current runtime status
- Retrieve available Motions and Sessions
- Run selected content
- Switch the currently running Motion
- Pause or resume playback
- Stop the current movement
- Return the device to its center position
The Windows client is suitable for:
- Game developers
- Mod creators
- Interactive software developers
- Advanced users who need local access to Motion Studio content
Third-party applications only need to send control commands. The actual multi-axis movement remains defined by the Motion or Session in Motion Studio.
This means developers do not need to recreate the complete movement path of every axis inside the game code.
For details about the Windows client API, request format, integration methods, and development examples, see:
Motion Studio Developer Guide
9. Recommended Creation Workflow
For first-time Motion Studio users, we recommend the following workflow:
- Click New Project.
- Set the Project name, description, and cover image.
- Create a basic Motion using only L0 (Stroke).
- Set the Range and a fixed BPM.
- Review the basic movement using the curve and 3D preview.
- Gradually add other axes, such as Twist, Roll, and Pitch.
- Use Phase to adjust the timing relationship between axes.
- Save the Motion and test it on the device at a low speed.
- Create additional Motions with different styles.
- Create a Session and insert multiple Motions into the timeline.
- Load video or audio when synchronized editing is required.
- After testing, publish the Project to Motion Hub.
We recommend learning Osc mode first and using Ramp mode when more precise or specialized movement is required.
For most continuous movements, Osc mode can produce effective results with fewer settings and less editing time.